Posted on

How To Set Year, Time and Date for BIOSYSTEM Time Recorder iClock (Setting)

How To Set Year, Time and Date for BIOSYSTEM Time Recorder iClock (Setting)

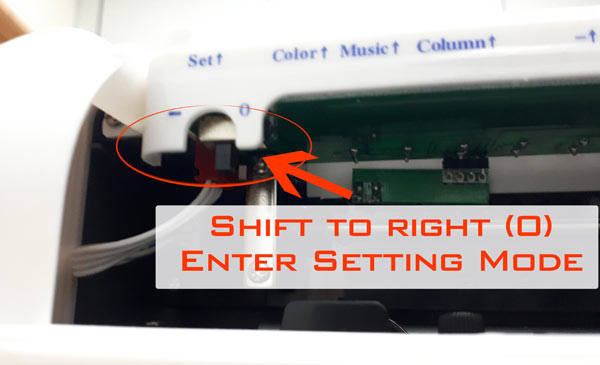
First Step: Shift The Setting button to right to enter setting mode. (As shown on photo below)

First Setting, Program Year

Biosystem Iclock Program 01

***Press Enter Button and Choose the years you wish to program using (+) and (-) Button.  Refer Image Below

Enter Button – Biosystem
(+) (-) Button – Biosystem


Second Setting, Program Date (Month and days)

Program 02 – Month and Days – Biosystem

Once done the year program, press enter again to proceed to program number 02 (month and days). Press Enter Button and Choose the month you wish to program using (+) and (-) Button and repeat for the days.


Third Setting, Program 12 or 24 hour Display

Program 03 – 24/12 hour display – Biosystem

Once done the month and days program, press enter again to proceed to program number 03 (12/24 hour display). Press Enter Button and Choose the 12 or 24 hours display mode you wish to program using (+) and (-) Button.


Final Setting, Program Time

Program 04 – Time setting – Biosystem

Once done the 12/24 hours program, press enter again to proceed to program number 04 (Time Setting). Press Enter Button and Change the hours you wish to program by using (+) and (-) Button and repeat the step for the minute setting. Once done Press Enter again and shift back the program to normal mode.

Need To Buy Another New Punch Card Machine / Time Recorder ? CLICK HERE TO FIND OUT

by Equest Enterprise

Posted on

Using the fake currency notes to buy two iPhones and a MacBook laptop.

PETALING JAYA: A technician claimed trial in the Sessions Court here today to four charges of using fake currency notes to buy various items last month.

Tan Kok Hong, 37, allegedly gave 20 pieces of RM100 counterfeit notes, equivalent to RM2,000, to Chin Hui Ting, 25, for the payment of an iPhone in front of Subang Parade shopping complex here.

On the second charge, Tan had allegedly used 24 pieces of RM100 counterfeit notes (RM2,400) at a Petron petrol station, near Armada Hotel, here.

He allegedly committed both offences at 10.45pm and 11pm respectively on Nov 4.

Tan was also charged with using 38 pieces of RM100 fake notes (RM3,800) to buy a MacBook laptop in front of AmBank in Jalan SS2/55, Sea Park, here, on Nov 9.

Need A Money Note Detector?

On the fourth charge, he had allegedly used 29 pieces of RM100 fake banknotes, equivalent to RM2,900, to buy an iPhone from Goh Wang Sheng in Jalan SS2/67, here, at 11.45pm on Nov 12.

He was charged under Section 489B of the Penal Code which provides for a jail sentence of up to 20 years and a fine, upon conviction.

Judge Azwarnida Affandi fixed Dec 15 for case mention.

Deputy public prosecutor Nadiah Malek Fauzie appeared for the prosecution while Tan was unrepresented.

Source:  freemalaysiatoday.com (02/12/2017)

Need A Money Note Detector?

Posted on

How to enroll user fingerprint on NIGEN N-928s Time Attendance

How to enroll user fingerprint on NIGEN N-928s Time Attendance

Nigen N-928s Fingerprint Attendance


Step 01: Enter To Menu

Press Menu Button – Nigen N928s


Step 02: Select Enroll Icon

Enroll Icon – Nigen N928s


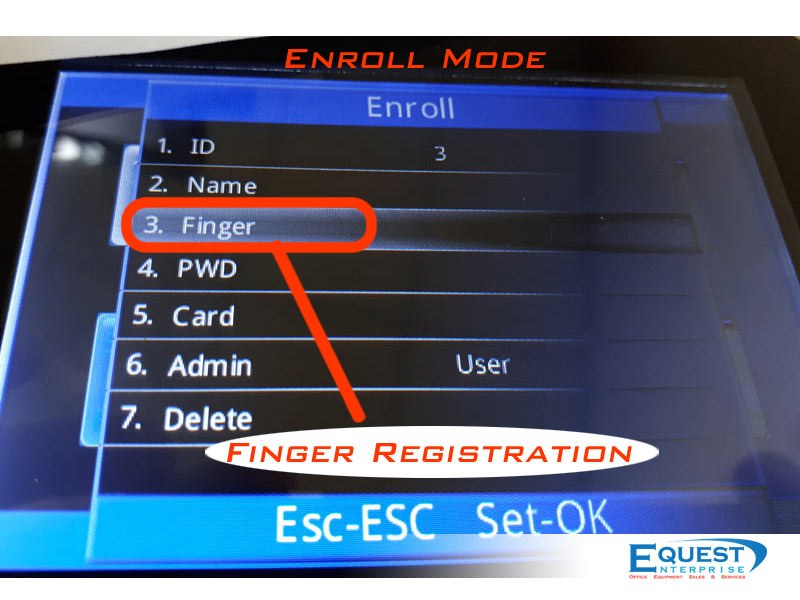
Step 03: Choose Finger to start Finger Print Registration  (Enroll mode)

Finger Menu – Nigen N928s


Step 04: Put your thumb / Finger print on the scanner (As shown in photo) to register thumb print. Repeat the finger print scan for 3 times to verify your thumb / fingerprint register correctly until it successful and completed.

Register Finger Print Process – First – Nigen N928s


Register Finger Print Process – First – Nigen N928s


Step 05: Once completed. Exit the program to try your finger print on fingerprint scanner

Finger Print Verify OK – Nigen N-928s


Nigen N-928s Fingerprint

Need To Purchase Another NIGEN N-928s ? Just CLICK HERE TO FIND OUT 


By Equest Enterprise

Posted on

How to set Door Access Panel DA3000

To reset to Factory Programming Password (Default Passowrd: 123456 )

Step1、Turn off power and connect bin 2&3 of RST(S1)。
Step2、Turn on power and buzzer gives 3 long buzz with green light flash fast。
If need to set Manager Card, now read two empty cards first one as Manager Add Card and
Second one as Manager Delete Card with red light flashing and continuous short buzz .
Step3、Turn off power, disconnect bin2&3 and connect bin 1&2 of RST。
Step4、Turn on power again.

How to set PIN For door access

Add Private Access Password(PIN)
Step: # Programming Passwo r d # 22 PIN #
Can enroll more than 1 PIN, Unlock door method : PIN #

Add card by input card No.

# Programming Passwo r d# 23 input card Number. #
Card No. is 10 -digit or 8-digit, machine auto -identify

Delete user by input card No.

# Programming Passwo r d# 43 input card Number #

Delete user by input PIN

# Programming Passwo r d# 44 input PIN #


For Full Manual Cilck > DA3000 User Manual For Download

Posted on

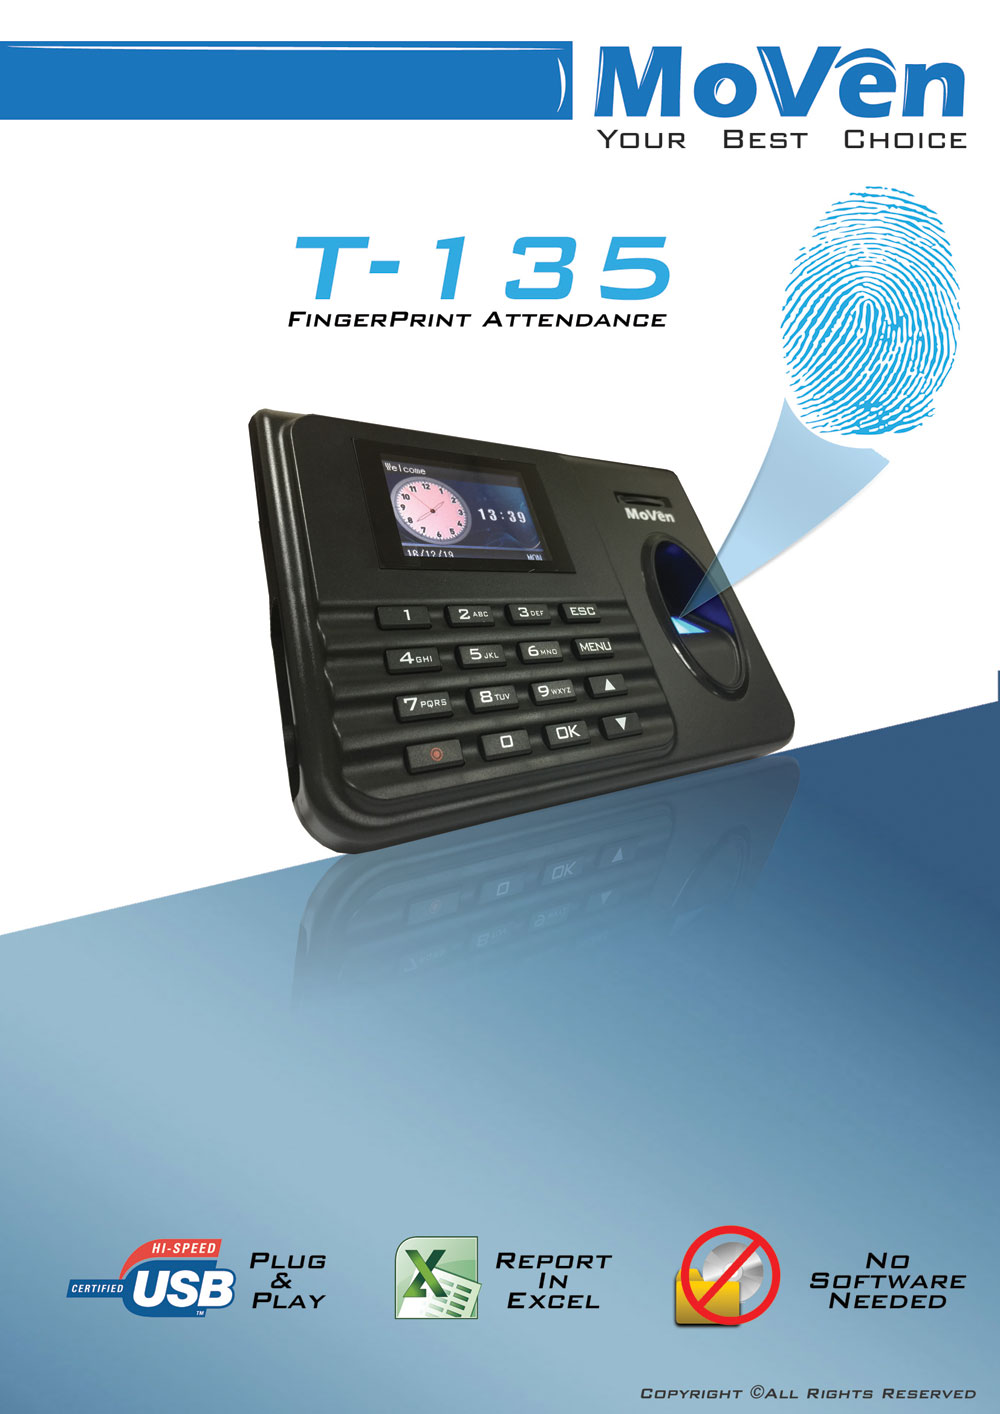
Moven T-135 Finger Print Attendance Instruction Manual

Register User

(Please READ Before Start Operate)

Download full manual here  Moven_T-135-instruction

HOW TO ADD USER

1 Press MENU
2 Select User Mgt
3 Select Add User
4 Select UserNm
5 Key In User Name
*Step to Key 1 Select the alphabet keypad
2 Press OK
3 Select the number
4 Repeat No.1 step for next alphabet
5 Once Complete Pree ESC

6 Proceed To Finger
7 Place the thumb on scanner to register the thumb print
Scan 2 times for verification
*If unsuccessful, try again
*Please place your thumb correctly
8 Once Complete, Press ECS To exit the programme

How To Add User In Excel Format (Prepare 1 USB Thumb Drive)
1 Press MENU
2 Select User Mgt
3 Select Download User **Remember plugin the thumb drive
4 Press OK
5 Once complete,Unplug the thumb drive
6 Plug in the thumb drive to PC
7 Double click the ” 01USERLIST.XLS”
8 Add User in Excel Format
(Format only accept number and alphabet)
**Key in symbol will cause the device hang)
9 Save the file, Please do not change the file name
10 Unplug the thumb drive from PC
11 Plug in the thumb drive to finger print device
12 Press MENU
13 Select User Mgt
14 Select Upload User
15 Press OK
16 Once Complete, Unplug the thumb drive
17 Press ESC to exit the programme


Shift Setting

(If shift no necessary, Set the shift to Null refer to “How to Select Shift For Different User” )

How To Edit Shift Table
1 Press MENU
2 Select Shift
3 Select Edit Shift
4 Select Shift 1
5 Select MON (Monday)
6 Select Section 1
7 Start-T (IN)
End-T (OUR)
Edit the time in both (IN & OUT) You prefer
*IN and OUT Must be a Number, NOT 00:00
*To disable the time, Please Edit the time to 00:00
8 For SECTION 2 & 3 Repeat From Step 6
9 For Next day (TUE, WED, THU, FRI, SAT & SUN) repeat from step 5 to step 8

**Cut Off Time
Normal Cut Off time will be 00:00
If your work place is close over mid night such as 01:00am, please change it to 01:30

*** Maximum 5 Shift available In This Device

How To Edit Shift Table In Excel Format (Prepare 1 USB Thumb Drive)
1 Press MENU
2 Select Shift
3 Select Download Shift **Remember plugin the thumb drive
4 Press OK
5 Unplug the thumb drive
6 Plug in the thumb drive to PC
7 Double click the ” 01SHIFT.XLS”
8 Edit the shift table in Excel
9 Save the file, Please do not change the file name
10 Unplug the thumb drive from PC
11 Plug in the thumb drive to finger print device
12 Press MENU
13 Select Shift
14 Select Upload Shift
15 Press OK
16 Once Complete, Unplug the thumb drive
17 Press ESC to exit the programme

How to Select Shift For Different User
1 Press MENU
2 Select User Mgt
3 Select UserView
4 Select the user (ViewAllUser Mode)
5 Select Edit
6 Select Shift (Press down cursor button to find the shift selection)
7 Press OK
8 Select The Shift you want to assign to the user
9 Press OK
10 ESC 2 Times
11 To select next user, Other wise just Press ECS to Exit to programe


Download Report

How to download report (Prepare 1 USB Thumb Drive)
1 Press MENU
2 Select Report
3 Select Clock_Report / Daily_Report
4 Select The Date you prefer on report
5 Complete The Start and End Date
6 Press ESC to start report **Remember plugin the thumb drive
7 Press OK to proceed download the report to thumb drive
8 Once Complete, ECS to exit the programme

Set Manager Prevent Unauthorise Login

How to assign the manager / Supervisor (prevent unauthorise login)
1 Press MENU
2 Select User Mgt
3 Select UserView
4 Select the Prefer User
5 Select Edit
6 Select Admin (Press down cursor button to find the shift selection)
7 Press OK
8 Choose Manager
9 Press OK
10 Press ESC, Press OK to Save
11 Press ECS To exit the programme

**Kindly take note: Maximum Up to 10 Managers only
PLEASE TRY SCAN/VERIFY FINGER BEFORE ASSIGN MANAGER
TO PREVENT UNABLE ACCESS THE DEVICE
**ONCE DEVICE UNABLE ACCESS DUE TO USER MISTAKE,
CHARGE WILL BE APPLY BY THE MANUFACTURE
TO UNLOCK THE DEVICE.

Setting Time & Date

How to Set Time And Date
1 Press MENU
2 Select Setup
3 Select System
4 Select Time
5 Select Time Again
6 Change /set the time/Date you prefer correctly
7 Enter the date/time you wish to enter and press OK to next setting
8 Once Complete, Press ECS To exit
9 Save Screen will prompt out, press OK to continue
10 Once Complete, Press ECS To exit the programme

Download full manual here  Moven_T-135-instruction

Prepare by Equest Enterprise For MOVEN T-135 Fingerprint Time Attendance

Posted on

How to reset BIOSYSTEM Punch Card Machine / Time Recorder Machine Setting

ALL Reset Setting For Biosystem Punch Card Machine


First Step: Shift The Setting button to right to enter setting mode. (As shown on photo below)

Biosystem Setting 


Second Step: Press and hold the 1st/5th/6th button altogether for 2 seconds. (As shown on photo below)

Button on top biosystem punch card machine


ALL Reset is to restore the default value including Date, Time, Time setting, Prinitng position and etc.

This setting apply for BIOSYSTEM Punch card machine /Time Recorder only


By Equest Enterprise